Connected cameras

Connected Cameras
Our camera solution allows you to replay and download footage recorded by the connected cameras installed in your vehicles, directly from MICHELIN Connected Fleet MyConnectedFleet. This guide will explain how to do this, and the user access required
Camera footage in MyConnectedFleet
1. Camera events within Journeys
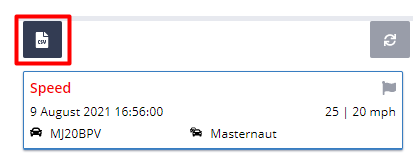
When an incident happens, typically an accident, the cameras will securely upload the footage of the incident to MyConnectedFleet. The footage includes the 5 seconds before and the 5 seconds after the incident and is made available automatically to view and download within the Journeys tab in MyConnectedFleet.
Similarly, drivers can also press the “emergency button” connected to the camera to trigger the same process, or press the button on the in-cab coach if they are equipped with it. Drivers can do this when they feel the need to record what is happening, for example, if they feel threatened.
In the example below, the driver pressed the emergency button.
By combining the camera footage and events alongside the harsh driver behaviour events within a journey it is possible to build up a more holistic profile of a driver's incidents.
MyConnectedFleet will record harsh events and camera events separately; so users are able to see where camera footage and harsh events combine, as well as more detail and context into the most serious harsh events recorded.
2. Knowing something happened
MyConnectedFleet has two different ways of letting users know that a camera event happened: instant alerts and scheduled reports.
Instant Alerts
To set up an alert for instant notification of camera events, go to the Settings tab, then the Create Alert option, and select “Camera Event” alert.
You can now set the parameters of the alerts, including selecting if the alert should be for an automatically detected incident or a driver pressing the emergency button.
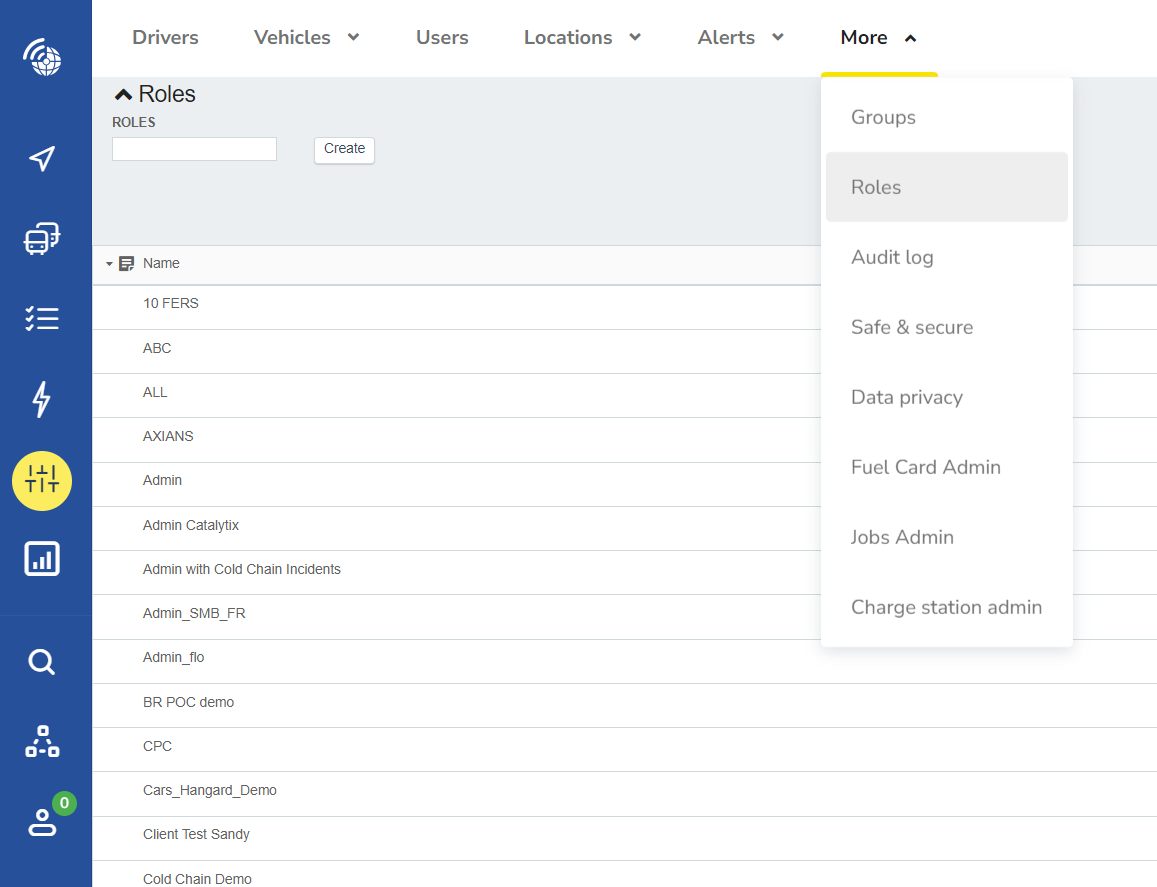
Note the user must have access to this feature, the following feature needs to be enabled on their ‘role’ in MyConnectedFleet (Settings → More → Roles)
Scheduled reports
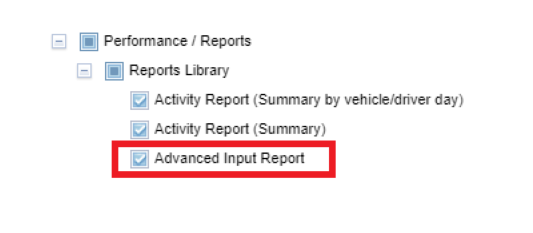
Alongside instant notifications it is also possible to set up a scheduled report, to see all camera events over a regular time period. This can be set up by going to the Reports Library, under the Performance Section (Advanced Input Report)
The report will provide a link to the video footage for each event, in addition the report can be exported as a .pdf, .csv or .xlsx file.
Just like all the other reports in MyConnectedFleet, you can set up the report as an automated email.
Note the user must have access to this feature, the following feature needs to be enabled on their ‘role’ in MyConnectedFleet (Settings → More → Roles)
Using the Autonomise platform
On the Autonomise platform, you can request on-demand footage, following the report of bad driving or near-miss from a member of the public for example.
If you are equipped with our cameras using Artificial Intelligence to flag potentially hazardous driving situations, you can also access the details of these events through the Autonomise platform.
You can access the Autonomise platform through the MyConnectedFleet platform via the partners button shown below. You will be automatically signed in with your MyConnectedFleet username and password.
Please note, the first time you log in you will be asked to set up a single sign in process using your MyConnectedFleet log ins. Once this is done, you will no longer need to log in separately.
If you do not see the ‘VisionTrack’ option in the partner icon above, ask your administrator to set you up as follows:
- Ensure the user is set up in MyConnectedFleet and that the user role contains the following features: (Settings → More → Roles)
- In Autonomise, go to ‘System’ then ‘User Management’ and create a new user.
To do so, do NOT select ‘Register with Email’, instead add the email address into the field called ‘Single Sign On’ and populate the other fields.
Choose the role ‘Standard User.’ Note the email address must be identical to the username of the user in MyConnectedFleet. If you want the user to be able to create other users, choose the role ‘Manager’.
1. Requesting footage on-demand
Select the vehicle in question from the filters. If you know the registration you can simply type it in.
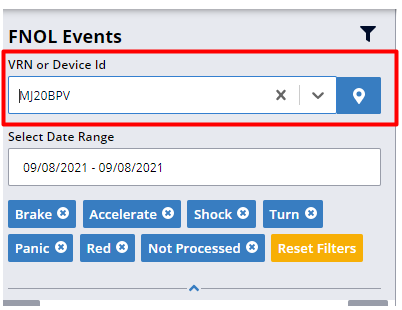
Scroll down to edit the date and time you want to request the video for. This will include 5 seconds before and 5 seconds after the time chosen.
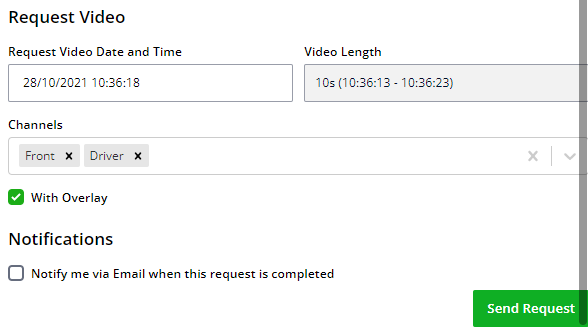
The request is then sent off to the device, if the ignition is on the video will be downloaded, alternatively it will download the next time the ignition is turned on.
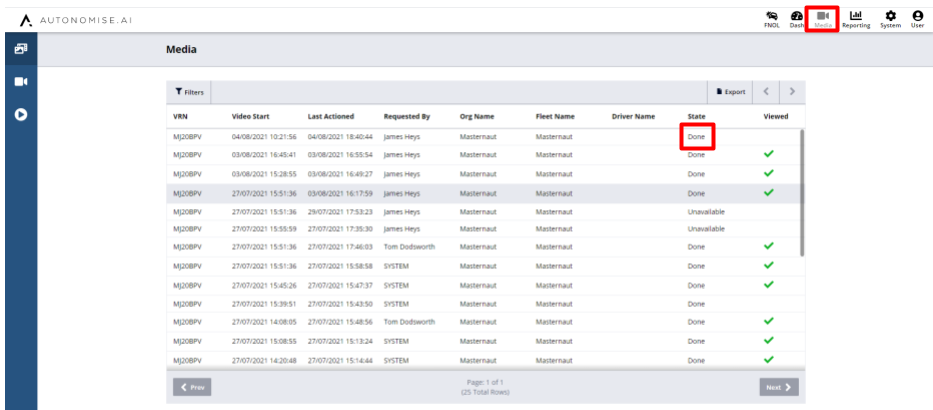
You can see a list of requested videos, including the status of them. Once the state is "done" you can view the footage.
If the video content is shown as "unavailable" this means that there is no footage for the time period requested which means that either the camera was switched off at this time or that the footage has been overwritten since because the storage capacity has been reached. To view the requested footage simply click on the row in question.
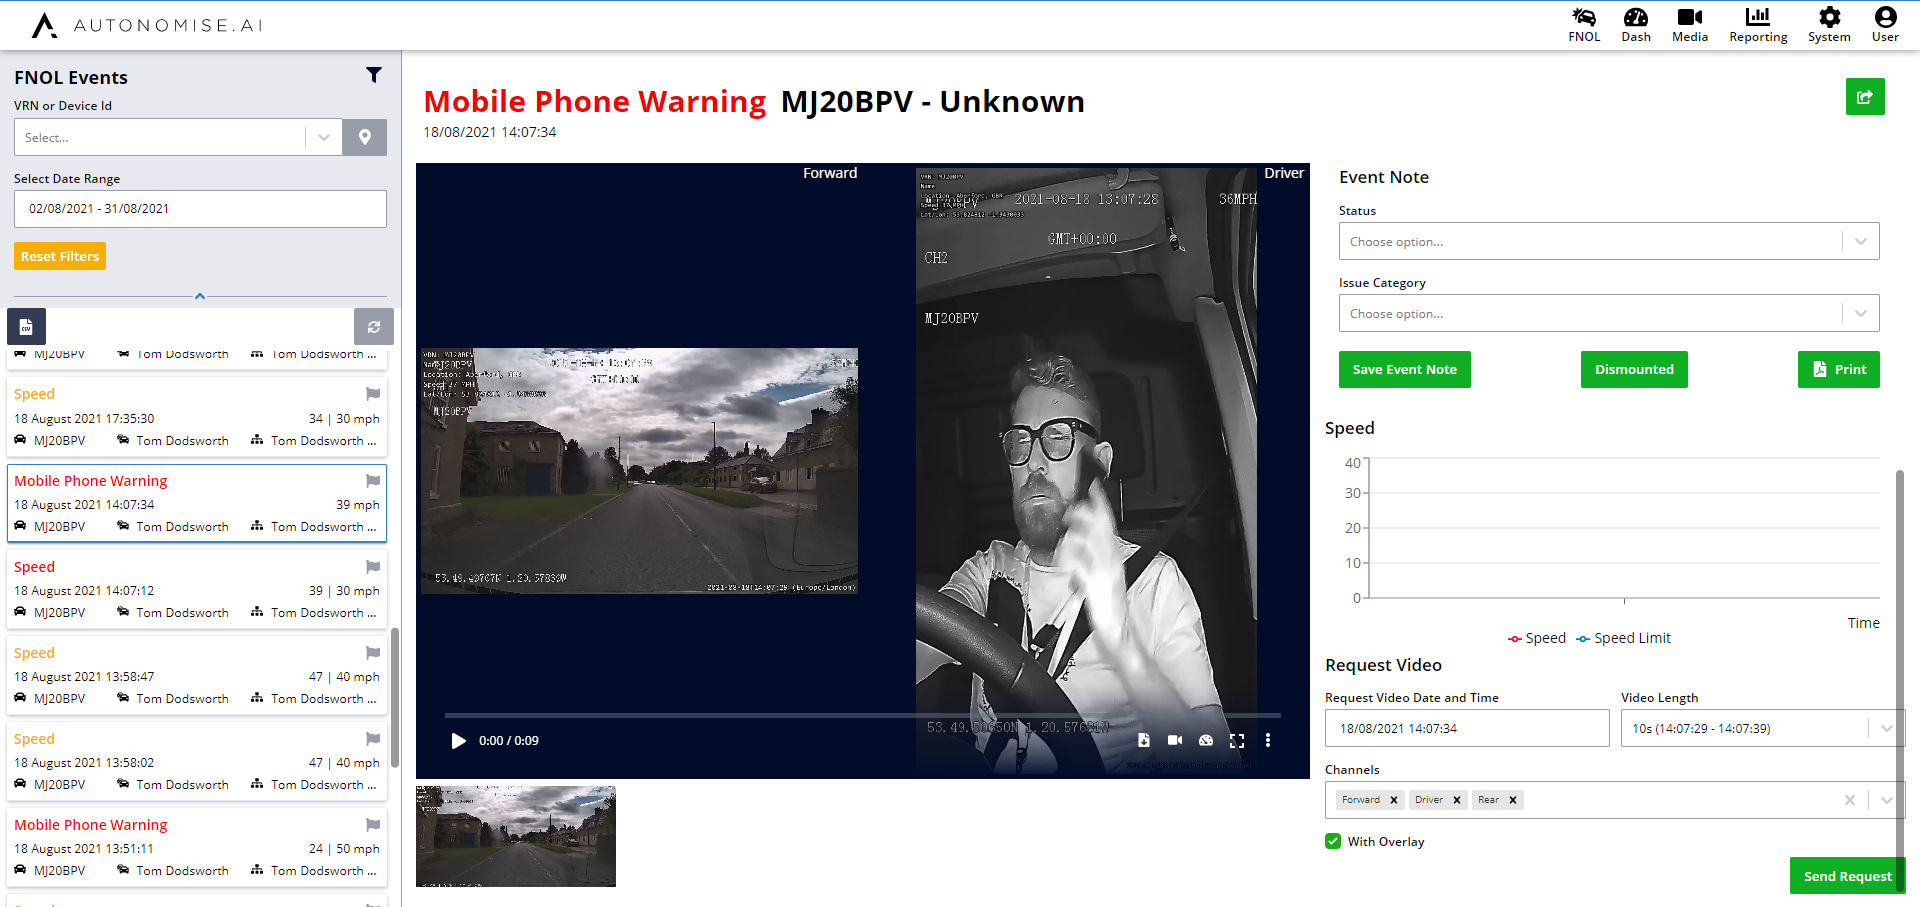
2. Investigating AI events
Use the filters on the left hand side to find the event you are after. For the date range it is recommended you select a specific date to reduce the number of results returned.
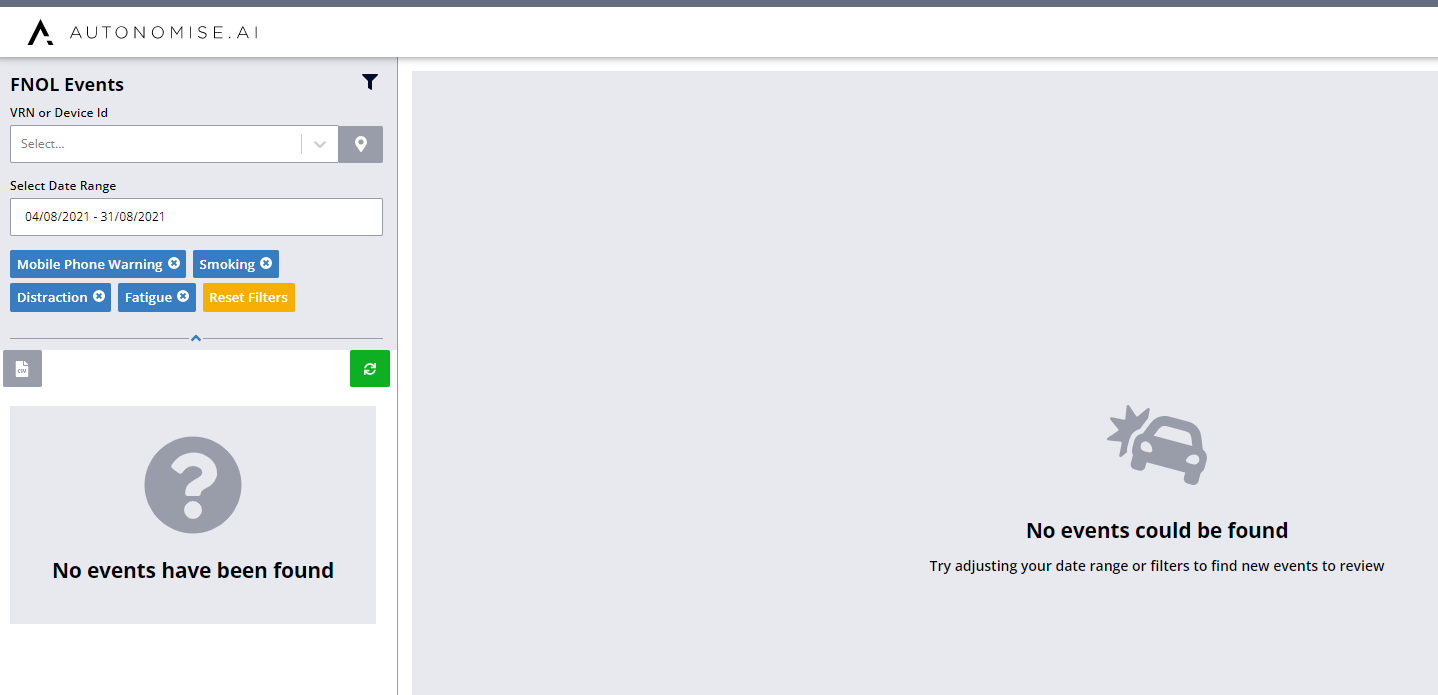
Select the filter icon to edit the filters applied and refine the results provided.
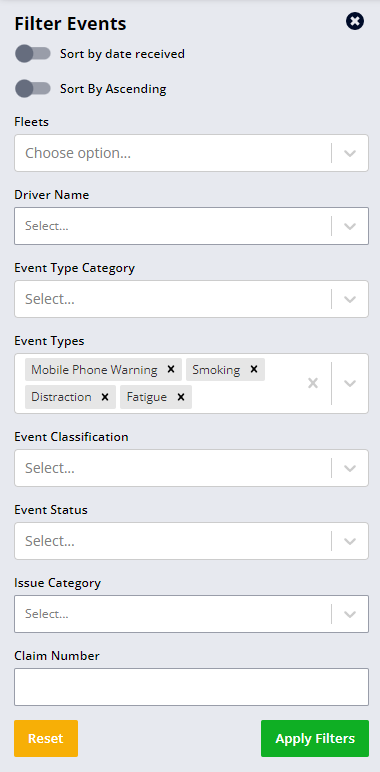
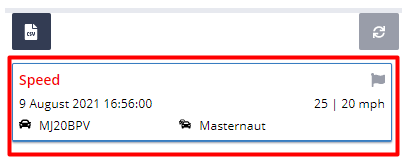
You can then select events from the list of results returned.
If the footage is available it will appear automatically when the event is selected, alternatively a map showing the location of the incident will be shown instead.
To export the list of events in the selected time period, click on the CSV download button shown below.