How to manage jobs with MICHELIN Connected Fleet Smart Job Management

MICHELIN Connected Fleet Smart Job Management set up
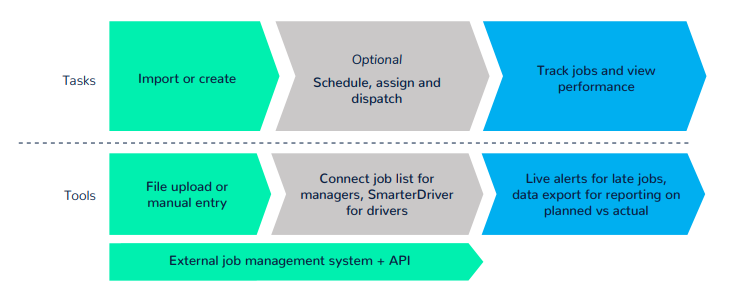
How MICHELIN Connected Fleet Smart Job Management works
MICHELIN Connected Fleet Smart Job Management uses the power of telematics data to help manage jobs within a fleet, from creation and scheduling to tracking and review. It’s a cohesive solution that provides better visibility and control over job status and scheduling, improves the end customer’s experience, and helps create a seamless workflow.
Setting up users
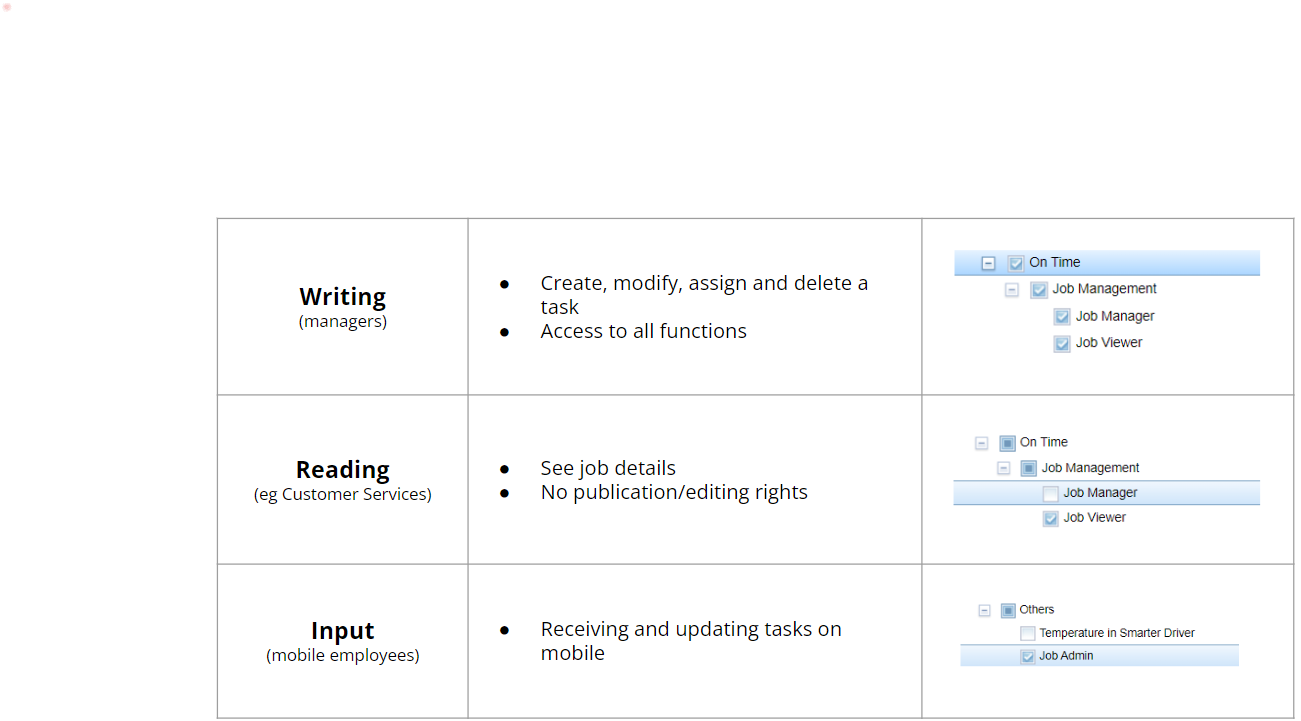
To access MICHELIN Connected Fleet Smart Job Management, users must be assigned a profile with an appropriate Role in MyConnectedFleet. There are usually three types of profile, each of which should have the following boxes checked in their Role. To change permissions, go to Settings, Alerts & Locations > More > Roles and Select features.
Importing and creating jobs
Importing jobs
Existing jobs can be imported into MyConnectedFleet via a .csv file. Select Import at the top right of the screen. ‘Title’ and ‘Client Name’ are mandatory, and either an address or longitude / latitude information is required. Columns must be ordered as follows:
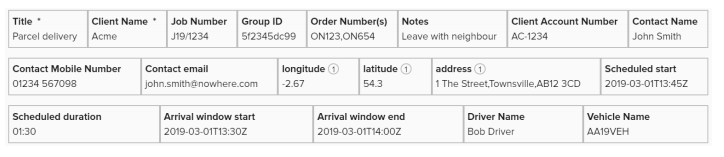
On the import screen, download a sample file by clicking Download Template.
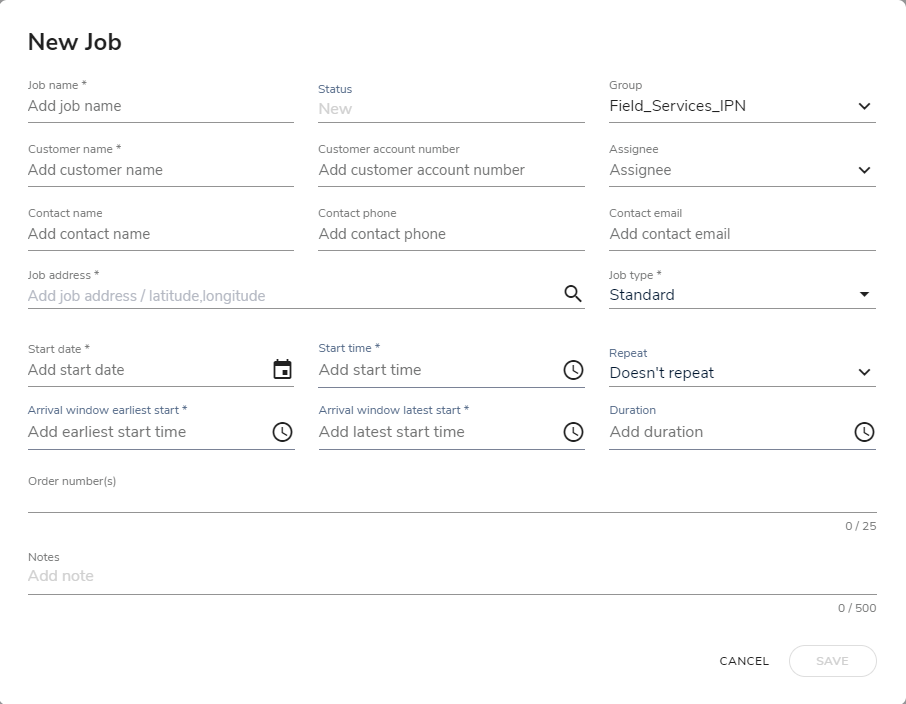
Creating jobs
Jobs can also be manually created within MyConnectedFleet. Select New and fill in the fields as necessary. Note: the ‘Group’ field limits the job’s visibility to MyConnectedFleet users who have corresponding access rights. It defaults to the top hierarchy, but it can be easily reassigned.
Creating Multiple Jobs
Multiple jobs allows users to link together two or more jobs in to one job for example a collection at one location and then a drop off at other locations. These are then linked together sequentially where one job has to be completed before the other can start. To create multiple jobs select + ADD JOB and from the options choose New Multiple job the job form can then be filled out in a similar manner as for a single job. Once you start creating the jobs you can see the list on the left as they are created
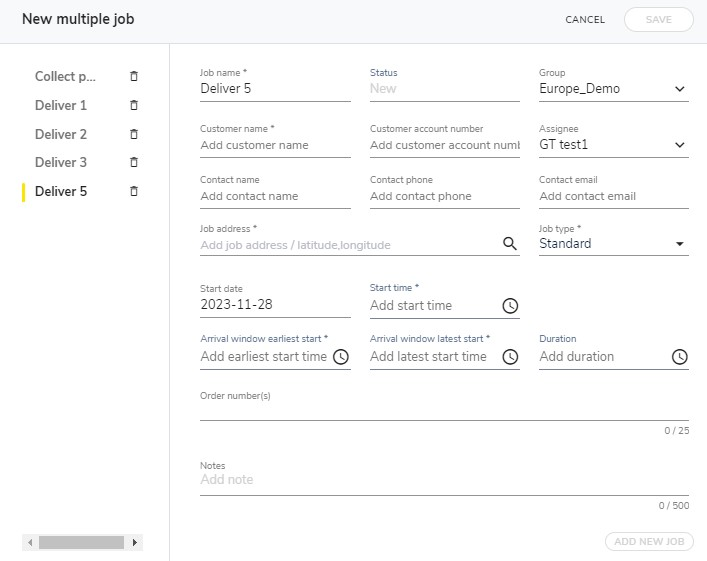
On the job list, multiple jobs are then clearly discernible with the multiple job icon.

Assigning and scheduling jobs
Assigning jobs
Jobs can be assigned to a driver or vehicle. Once a job is assigned, the details will be dispatched to the associated driver via the SmarterDriver app, and its progress will be tracked in MyConnectedFleet. If jobs are already assigned in an existing job management platform and imported via API or .csv, they will be automatically assigned to the corresponding drivers/vehicles. To manually assign or reassign a job (including jobs that have been imported), click the ‘Assign to’ or existing assignee dropdown within the job list in MyConnectedFleet.
Scheduling jobs
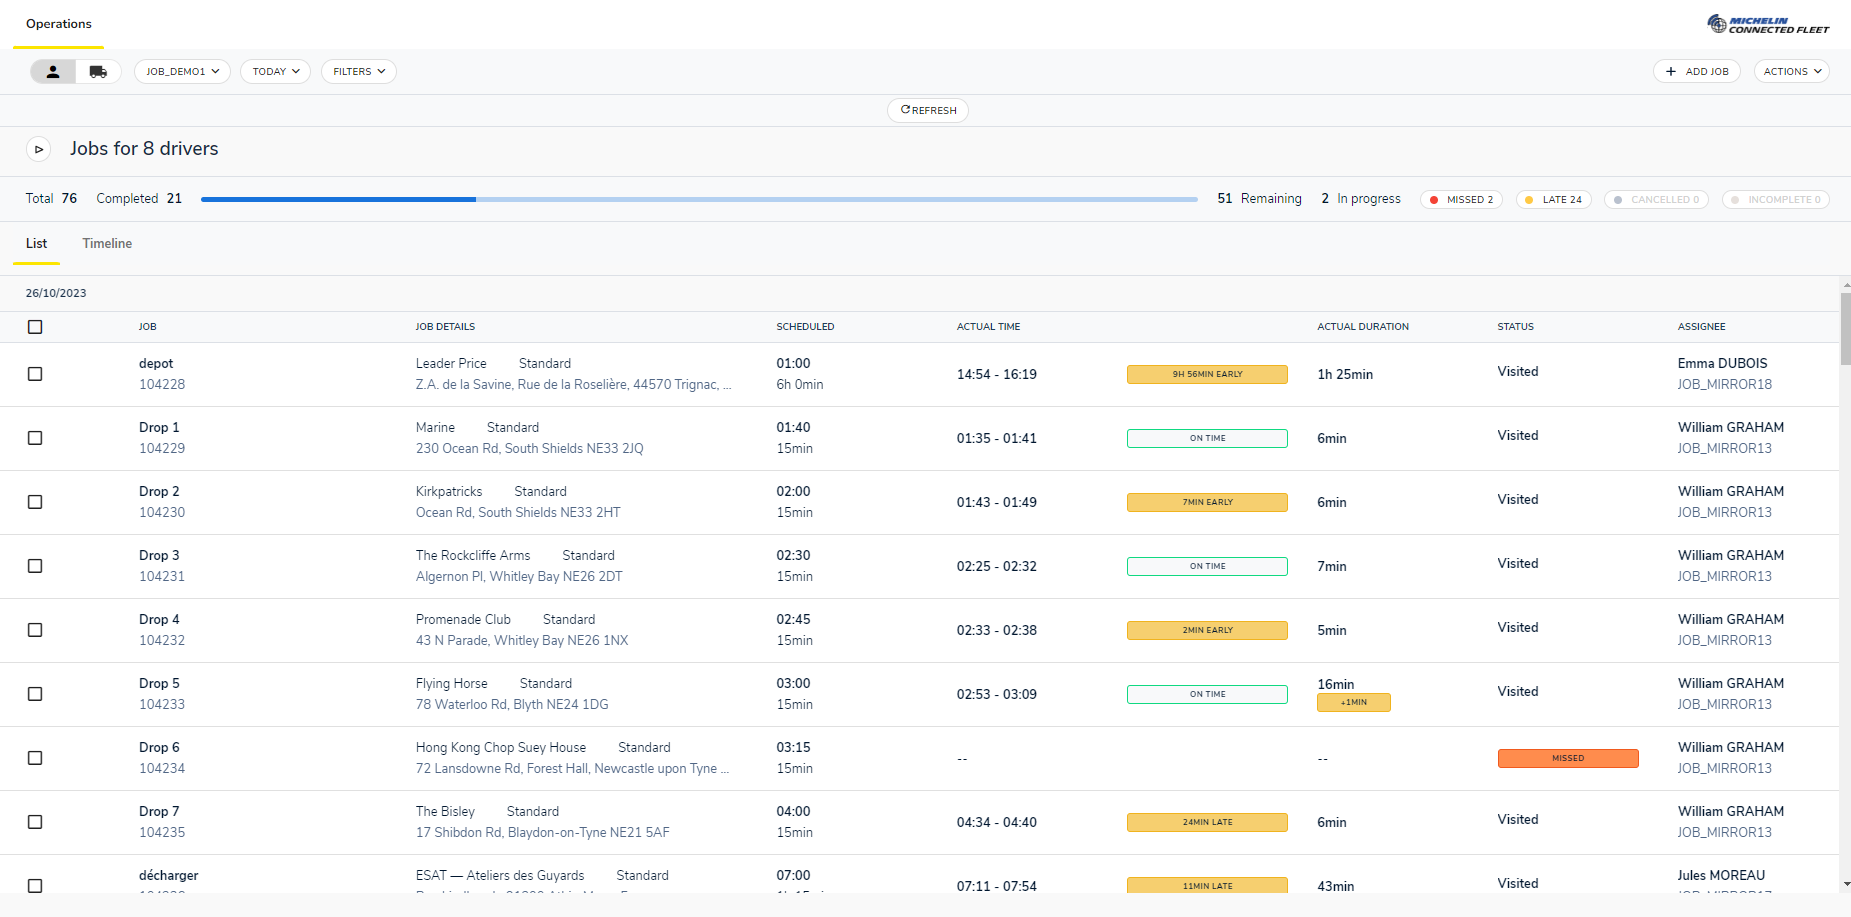
The job list shows key information, including scheduling details and who jobs are assigned to. From here, any job can be edited by clicking on it. If a job is created but unscheduled, planned arrival and duration times can be added at any point.
Tracking, proof of delivery and exporting jobs
Tracking jobs
Once a job has been assigned and scheduled for a specific date, it will be automatically tracked for actual arrival and departure times.
- Actual arrival time is triggered when a driver/vehicle arrives within a 200m radius of the job address and the engine is turned off.
- Actual departure time is triggered when the driver turns the engine on and leaves the 200m radius of the job address.
Drivers are also able to manually record a job’s start and end time through the SmarterDriver app. This time will take precedence in MyConnectedFleet, but the automated time will still be available to view.
Actual arrival and duration is compared with scheduled arrival and duration times to reveal whether jobs are running to plan. This information can be viewed on the job list.
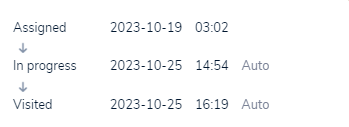
Clicking on the job status will reveal a simple audit trail of the job history, including job creation, progress and if any edits were made.
This is a workflow featuring every possible job status:
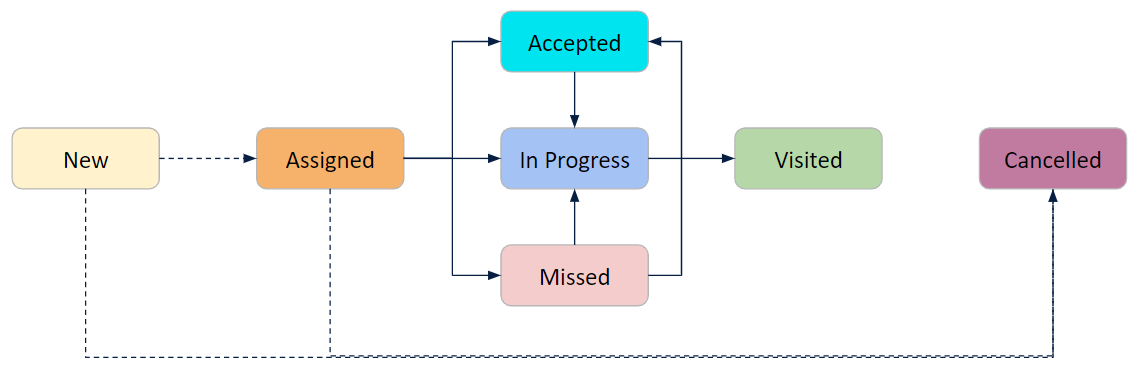
List of MICHELIN Connected Fleet Smart Job Management job statuses:
- New: job created without assigned asset
- Assigned: job created AND assigned to a vehicle or driver
- Accepted: job manually accepted by driver via SmarterDriver
- In Progress: Driver/vehicle has an end of journey event within a 200m radius of the job address
- Visited: Driver/vehicle has left the 200m radius of the job address after In Progress
- Missed: If an Assigned job has not switched to In Progress, Visited, or Cancelled within 30 minutes after the arrival window end + job duration, then the status will automatically update to Missed. Missed can still go to In Progress if the asset visits the location
- Cancelled: job manually cancelled by driver or manager (or API)
Proof of delivery
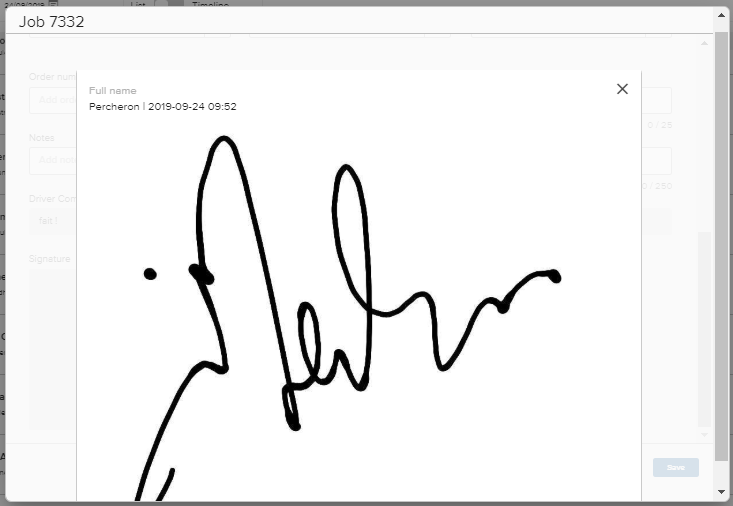
Using the SmarterDriver app, drivers and workers can capture customer signatures and take photos as proof of delivery or attendance.
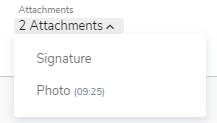
Any job that has this information attached can be easily seen in the job list by the icons next to the job number. To view the customer signature or attached photos, click the job number.
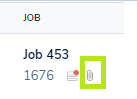
Clicking the job number will open up all the job details, including signatures and photos attached. Click on either to view the signature or photo.
Exporting jobs
All job data can be exported as a .csv file via the Export button. This can be used to run reports on job efficiency within a fleet.
For example, compare planned arrival times with actual arrival times or view which drivers are most frequently late or on time.
Our API is also able to directly feed job information from MyConnectedFleet back into an external job management system.
Sharing your driver's Estimated Time of Arrival with your customers with SMS and email notifications.
Keeping your customers in the loop and making sure they know when your driver will arrive can significantly boost your operations productivity and help you cut costs due to last minute rescheduling.
Jobs Admin
This section contains settings designed to tailor the job management experience to individual businesses requirements.
Job Settings
This page allows customers to choose a specific missed time that will be applied to all of their jobs. The missed time setting determines how long a job will remain open past its scheduled start if a driver has not visited site or completed the job on the smarter driver app.
Job Types
To speed up job creation and ensure accuracy, job types allow users to add a set of standard thresholds they would like to apply to their jobs that match a particular type. A specific job type can then be selected when creating jobs using the new job form or importing jobs via CSV or API. Once the job type is assigned the information from the fields in the job type will be populated without the need to do it manually.
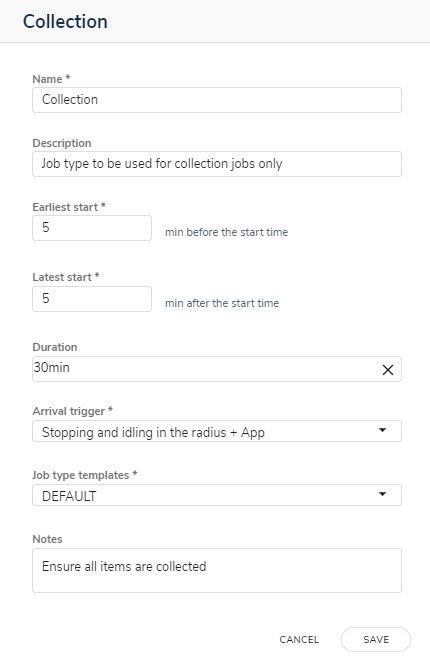
- Name: The name is used to identify the job type either via the drop down menu on the new job creation form or used as a field in a CSV import file.
- Description: Description is only used on the list of job types so users can see what the specific job type has been set up for.
- Earliest and latest start: These settings determine the arrival window for jobs and will be automatically calculated from the supplied start time
- Duration: The length of time a job of this type should last. this could be the average or the maximum time.
- Arrival trigger: This allows customers to determine how the system should recognise that a job has been visited:
- Stopping and idling in the radius + App: This is the standard option. Requires a vehicle to either stop or idle in a job radius to update the job status or the driver uses the mobile app to manually edit the status.
- Any event in the radius + App: Similar to the above but this setting also allows the job to be updated by the vehicle simply driving in to a job radius and back out without stopping or idling.
- App only: The job status will only update when the driver uses the mobile application.
- Notes: Any job notes you would like the driver to see via the smarterdriver application