Setting up your vehicle Checks solution
- How the vehicle Checks solution works
- Choosing which Vehicles are eligible for Checks
- Selecting which vehicles you want to enable vehicle checks on
- Granting MyConnectedFleet users the permission to assign vehicle checks.
- Import untracked vehicles
- Create custom checklists
- Duplicate the template
- Set up email notifications
- Edit existing vehicle checklists
- Assign the template to a vehicle
How the vehicle Checks solution works
The MyConnectedFleet platform and the SmarterDriver mobile app provide a simple, digital process for performing and managing vehicle checks.
Choosing which Vehicles are eligible for Checks
In order to use vehicle checks for your fleet, you must select which vehicles you would like to be checked. The enabled vehicles will be the ones available to your drivers in their SmarterDriver mobile app to perform vehicle checks on. Drivers will only be shown the vehicles within their group setting.
Selecting which vehicles you want to enable vehicle checks on

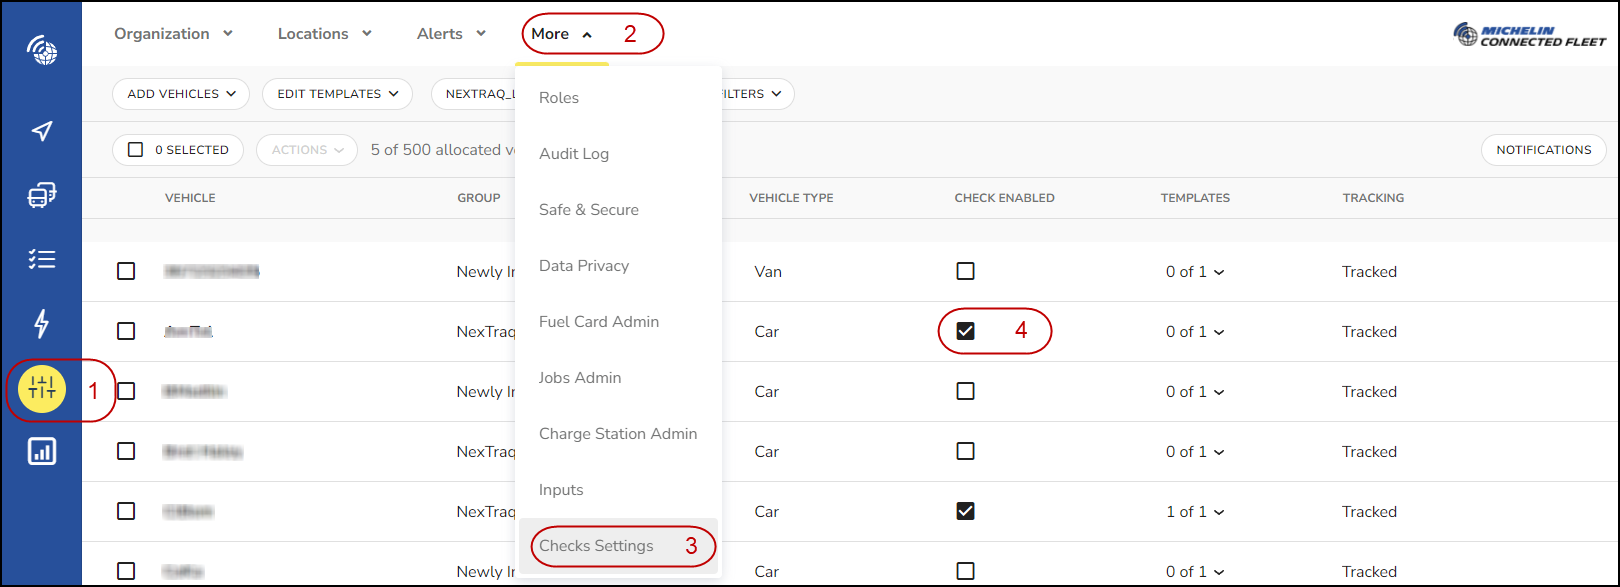
- Click on "Settings, Alerts, and Locations" on your menu
- Click on "More"
- Select "Checks Settings"
- Click the CHECK ENABLED box next to the vehicles you wish to enable vehicle checks for.
Granting MyConnectedFleet users the permission to assign vehicle checks.
As an administrator, you must enable this role for designated users in order for them to be able to assign vehicle checks.

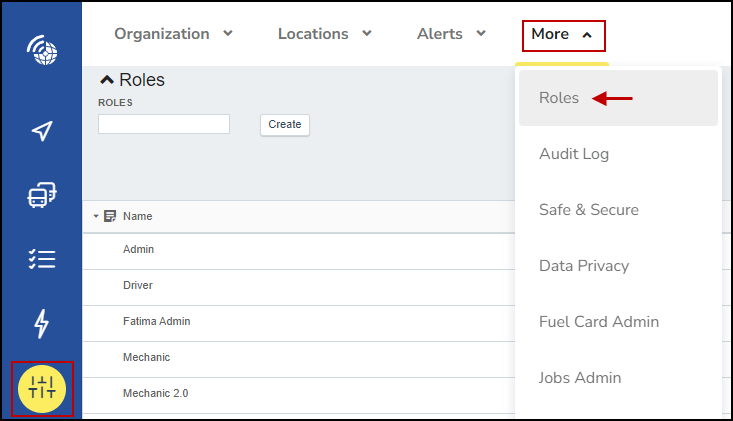
Go to Settings, Alerts, and Locations > More > Roles to open the Roles page.
On the Roles page, click on the Actions pencil icon and choose Select features.

On the Select features pop-up window navigate to Settings / Vehicles and select Vehicle Checks Settings.

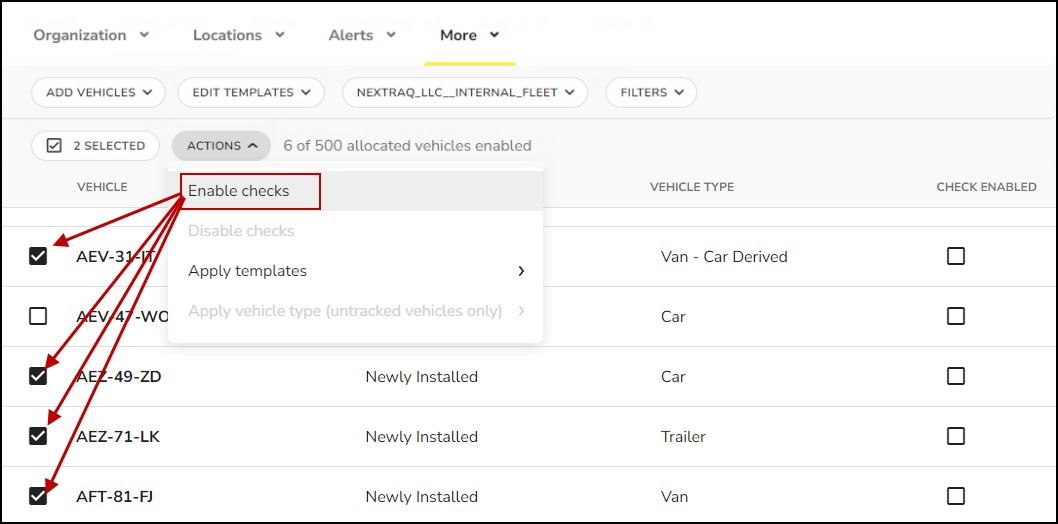
If you wish to enable or disable a specific vehicle, you can simply find that vehicle and tick the checkbox under the ‘Check Enabled’ column.
If you want to enable a group of vehicles, you can activate the Filters and hierarchy selector to help you narrow down your vehicles (i.e. by a specific Group). Then use the multi-selection tool on your group to Enable or Disable Checks.

Import untracked vehicles
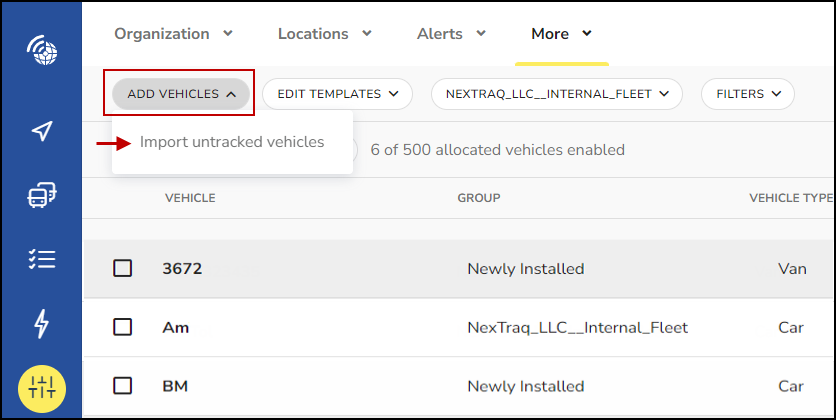
In order to add vehicles which are not currently tracked by a MyConnectedFleet telematics device to your vehicle checks list, add them via a .csv import. By selecting the ‘Add Vehicles’ button, you will see the option to ‘Import untracked vehicles.’

This will open the Import untracked vehicles option. You can use the 'DOWNLOAD TEMPLATE' option to generate a template you can use to prepare your import file. After downloading the template file, you will need to provide the name or registration of the vehicles that you wish to import in the specified column. The file must be saved in a csv format.
Click + SELECT FILE and then use the Group dropdown to select which Group the uploaded vehicles will assigned to. Then click START IMPORT.

Because the uploaded vehicles are untracked, these vehicles will only be visible in MyConnectedFleet within the Vehicle Checks solution. Once you have imported these untracked vehicles, you are able to select them in the same fashion as tracked vehicles, and they count towards the total number of vehicle checks you purchased when you set up your account. If you need to enable more vehicles, contact your MyConnectedFleet account manager.
Create custom checklists
To create a new customized Check template, select ‘Edit template’.

You can create a new template from scratch by choosing ‘New template’ in the dropdown box. This will open the New Template screen.

To create a new template:
- Enter your new template name
- Enter the minimum duration (in minutes) the Vehicle Check should take (this is optional)
- Enter note you would like to display to driver when they submit their Vehicle Check (this is optional)
- The number of checks you create under each main Section will be displayed here
- Enter the section name you are going to add certain checks to (e.g. Engine)
- Enter the check name
- Add a full and clear description of the check
- Click on the PHOTOS dropdown and select when the driver is required to add a photo:
- If Defect
- Required
- Optional
- Disabled
- Click on the NOTES dropdown and select when the driver is required to add notes:
- If defect
- Required
- Optional
- Click on the TEXT dropdown and select if notes should be recorded as:
- Text
- Numeric
- Click on the three dots if you wish to duplicate a check or delete a check
- Click Add Check to add another check under the Vehicle Check section you are working on
- To add another Vehicle Check section, click on + ADD SECTION
- Once you have added all of the Sections and Checks, click on SAVE TEMPLATE to create your new Vehicle Check template.
Duplicate the template
If you wish to copy a current template, and use this for a new template you can do so by selecting the ‘Duplicate’ button within the custom template pop-out. The duplication of this will copy all checks and sections from the previous template, and these can then be changed within this newly created template.

To save the new template, click on the SAVE TEMPLATE button.
Set up email notifications
To set-up email notifications, open the Vehicle Checks Settings page, and select 'Notifications'.

Checks that have been performed and a defect is raised will be sent by default, where you can add the filter 'Pass' to receive all checks performed.
To make selective email notifications going to recipients, you can select the group that the vehicles belong to via the 'Groups' button. If a vehicle within this group performs a check and it raises a defect, the recipient will receive an email. You can also be specific with the vehicle type of the vehicle, so that notifications are a lot more specific and targeted to certain recipients.

Edit existing vehicle checklists
To access your existing vehicle checklists, click on the ‘Edit template’ button and select the template that you wish to make changes to. Once you have made these changes, click on the Save button.

Assign the template to a vehicle
Within the column ‘Templates’ you will be able to assign templates to individual vehicles. To do this, click on the TEMPLATES dropdown box and select the box next to each template you want the selected vehicle to have available, which will be the templates viewable by the driver within the SmarterDriver app.

If you want to assign templates to multiple vehicles at one time, click the boxes next to each vehicle you want include and then click the ACTIONS button. Next select 'Apply templates' and then select the template(s) you want to apply. These templates will be viewable by the driver within the SmarterDriver app.

