Steps To Set Up Your OEM Integrations

Many OEM vehicles can report information directly to your Michelin Connected Fleet account.
Depending on which OEM you are connecting to your account, there are actions that you must take in order to allow a qualified OEM vehicle to transmit needed information to us.
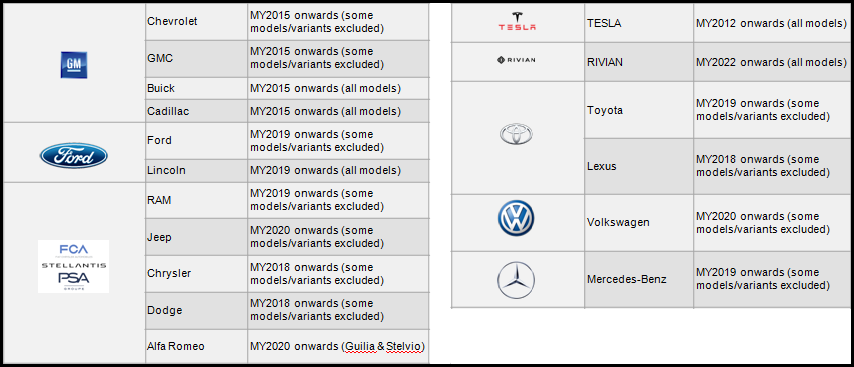
Here is a list of compatible OEM's (we will confirm individual vehicle compatibility upon receipt of your vehicle list):
Please use the menu to the right (or scroll down) to select your vehicles OEM. Follow the actions you may be required to complete to enable your OEM vehicle to successfully transmit data to your Michelin Connected Fleet account.
GM OEM enablement Instructions
STEP 1 – CONFIRM YOU HAVE PROVIDED CONSENT TO OnStar TERMS & CONDITIONS
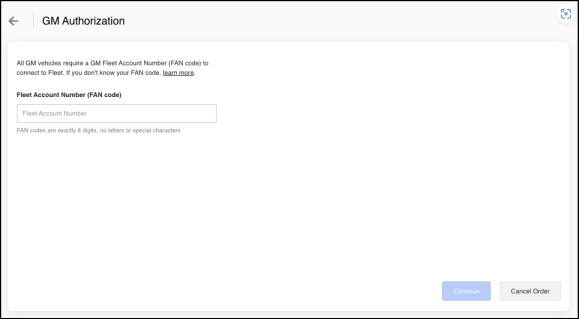
If you have not, locate your GM Fleet Account Number (FAN)
- Go to: GM E-Signature Portal
- Complete OnStar Terms & Conditions:
- Review details about the T&C’s on the home page and click ‘I have read and agree’.
- On the GM e-Signature page, provide the requested contact information and click ‘Launch Electronic Signature Process’ button.
- Review the E-Sign Disclosure and click, ‘Yes, I agree to sign electronically’.
- Review the OnStar Fleet Master Account Service Subscription Agreement and click the yellow ‘Click Here to Sign’ button.
- Download a copy of the contract for your records. A copy will also be emailed to you.
STEP 2 – CONFIRM ALL VEHICLES ARE LISTED
- Ensure all the vehicles you wish to track are visible in your GM Fleet account.
- If your vehicle is not in the list, you will need to add the vehicle(s) manually.
- During the process of adding your vehicles to your account, you are asked to enter your FAN:
- GM may require you to provide acceptable proof of eligibility documents. Vehicle titles, registration, or proof of insurance on company vehicles are acceptable.
STEP 3 – ENABLING ONSTAR OR LOCATION SETTINGS (if available on your vehicle and not currently active)
OnStar:
- Confirm that location settings are enabled for the vehicle.
- Some of your company’s GM vehicles may require OnStar hardware activation so that OnStar may communicate with the vehicle. This can occur if the vehicle tracking unit is in a dormant state, is disabled, or has not been configured. A brief process must be followed by the driver of these vehicles beginning with a Blue Button Key Press (BBKP).
- Please advise the drivers of these vehicles to follow the steps below between the hours of 8am and 9pm Eastern Standard Time (EST), Monday - Saturday:
|
Here are some tips to help your drivers activate their GM OnStar hardware:
Location Settings:
A subset of GM vehicles may require Location Settings to be enabled to allow your vehicles to report GPS data. If they are available and disabled in the vehicle, follow the steps below to enable:
 |
STEP 4 - NOTIFY US
Please confirm to us via email to mcfna-deployment@michelin.com as soon as you’ve completed the above steps. In the email, please provide us with the best number and time to reach you.
FORD OEM enablement Instructions
STEP 1 – LOG INTO YOUR FFM (FORD FLEET MANAGER ACCOUNT)
STEP 2 - PICK YOUR VEHICLES
- Ensure all the vehicles you want to provide consent for are visible.
- If your vehicle is not in the list, you will need to add the vehicles manually, either individually or by bulk upload with a CSV file. Select the ‘Add Vehicles’ button to start the process. You will need the 17 character VIN number in order to do this.
STEP 3 - PROVIDE CONSENT
- Use the bulk actions button to easily add and remove consent or delete vehicles.
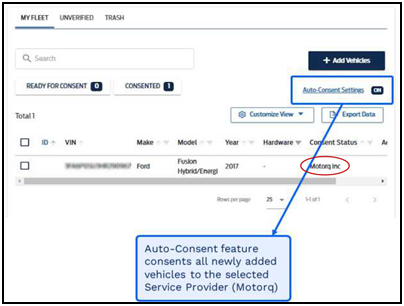
- When adding consent, please ensure you select ‘Motorq, INC US or Canada’ as the service provider from the drop down.
- VIN’s not present in your FFM account may require proof of ownership prior to consent. Ford will identify VIN’s needing ownership documentation. Email fcseu1@ford.com your FFM account number and verification of ownership documentation – one of the following is acceptable: bill of sale, registration, title, or insurance card. Once verified, you should see all vehicles listed in the ‘Vehicles Tab'.
- Select all the vehicles you want to provide consent for.
STEP 4 – DETERMINE IF YOUR VEHICLE REQUIRES CONNECTIVITY SETTINGS TO BE ACTIVATED
Check the vehicle user manual to determine if your vehicle has a settings option to turn on Connected Vehicle Features (this option is not required/available on some makes and models).
If this option is not available on your vehicle, proceed to STEP 6.
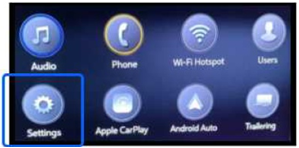
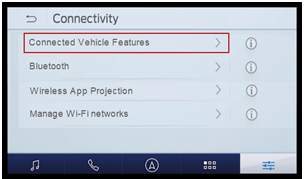
- In an area of good signal, ignition-on the vehicle and in the vehicle infotainment screen, tap Settings
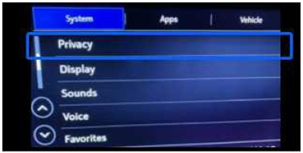
- From the Settings, tap either FordPass or Connectivity (name and screen view varies based on vehicle make, model and year).

- Next, tap either the ‘Connected Vehicle Features’ or ‘Vehicle Connectivity’ option (name and screen view varies based on vehicle make, model and year).
- Next, ensure all data and connectivity options are enabled (options vary by vehicle make, model and year).
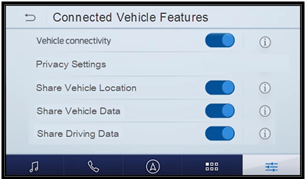
- Next, cycle the ignition (turn the vehicle off, and then restart the vehicle). This step is necessary to start the data transmission process.
STEP 5 – (OPTIONAL) CONFIRM THE FORD SYNC SOFTWARE IS UP TO DATE.
SYNC is the software in Ford vehicles that powers the vehicle’s connectivity to vehicle data, entertainment, navigation, Bluetooth connection, voice recognition, and Wi-Fi. It is accessed through the vehicle’s infotainment interface. Occasionally, this software needs to be updated to stay up to date with configurations, security, and features.
To check if your software is up to date:
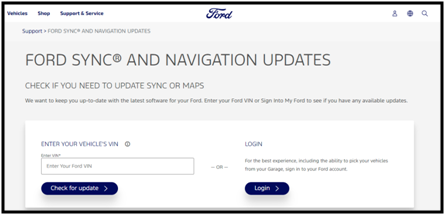
- Input the VIN and click ‘Check for Update’
- If SYNC update is available, proceed with updating the vehicle via Wi-Fi, USB, or visit your Ford dealership (Detailed instructions can be found here).
STEP 6 - NOTIFY US
- Please confirm to us via email to mcfna-deployment@michelin.com as soon as you’ve completed the above steps. In the email, please provide us with the best number and time to reach you.
STELLANTIS OEM enablement Instructions
STEP 1 – PROVIDE US WITH THE VIN NUMBERS OF THE VEHICLES YOU WISH TO ACTIVATE
STEP 2 – WE WILL CONTACT YOU IF WE ARE UNABLE TO ACTIVATE A VEHICLE ON YOUR LIST
- During the pandemic, certain vehicles were shipped without the location hardware installed. Without this hardware, the vehicle is not able to transmit data. We will not be able to active those vehicles.
- Some vehicles that have the location hardware installed may have out of date software. In this instance, we will identify those vehicles and provide you with instructions on how to do an OTA (Over The Air) update.
STEP 3 – IF AN OTA UPDATE IS REQUIRED, PLEASE NOTIFY US ONCE YOU HAVE SUCCESSFULLY COMPLETED THE OTA PROCESS
- Please confirm to us via email to mcfna-deployment@michelin.com as soon as you’ve completed the above OTA update. In the email, please provide us with the best number and time to reach you.
TESELA OEM enablement Instructions
STEP 1 – PROVIDE THE VIN NUMBERS OF THE VEHICLES YOU WISH TO ACTIVATE
STEP 2 – A MICHELIN CONNECTED FLEET TEAM MEMBER WILL CONTACT YOU TO PROVIDE AN ACTIVATION EMAIL ADDRESS
If your driver does not have a Tesla account, they can create one by following the below steps:
- Navigate to the Google Play Store for Android devices or the Apple App Store for iOS devices and download and install the Tesla app.
- Open the app and tap on Create Account.
- Enter the required fields to create the account.
- Each driver will be required to log into their Tesla account and enter the email address provided by the MICHELIN MyConnectedFleet representative. This will allow your vehicle to share necessary vehicle tracking data via the could.
STEP 3 – NOTIFY US
Please confirm with us via email to mcfna-deployment@michelin.com as soon as you’ve completed Step 2.
- In the email, please provide us with the best number and time to reach you.
RIVIAN OEM enablement Instructions
STEP 1 – PROVIDE THE VIN NUMBERS OF THE VEHICLES YOU WISH TO ACTIVATE
STEP 2 – MICHELIN MyConnectedFleet WILL ELECTRONICALLY VERIFY YOUR LISTED VEHICLES ARE SET UP AS COMMERCIAL VEHICLES AND NOT CONSUMER USE VEHICLES
- Vehicles must be set up as commercial vehicles in order to transmit the necessary data required to provide tracking information on your account.
- If a vehicle is set up as a consumer vehicle, no action is needed from you. We will work with Rivian to port any consumer vehicles to a commercial state.
TOYOTA OEM enablement Instructions
STEP 1 – LOG INTO YOUR TOYOTA FLEET ACCOUNT
STEP 2 – CONFIRM ALL VEHICLES ARE LISTED
- Ensure all the vehicles you wish to track are visible in your Toyota Fleet account.
- If your vehicle is not in the list, you will need to add the vehicle(s) manually.
- Toyota may require you to provide acceptable proof of ownership documents. Vehicle titles, registration, or proof of insurance on company vehicles are acceptable.
STEP 3 – NOTIFY US
- Please confirm to us via email to mcfna-deployment@michelin.com as soon as you’ve completed the above steps. In the email, please provide us with the best number and time to reach you.
VOLKSWAGEN OEM enablement Instructions
STEP 1 – PROVIDE THE VIN NUMBERS OF THE VEHICLES YOU WISH TO ACTIVATE
Determine if any of the provided vehicles have Volkswagen Car-Net enabled (Volkswagens GPS tracking program). If none of the vehicles on your list have Car-Net enabled, skip to Step 3.
STEP 2 – UNENROLL VEHICLES THAT HAVE VOLKSWAGEN CAR-NET ENABLED
- Vehicles must have Car-Net disabled in order to transmit the necessary data required to provide tracking information on your MICHELIN MyConnectedFleet account.
- If a vehicle has Car-Net enabled, follow the instructions below to unenroll the vehicle:
For Model Year 2020 and newer, you can unenroll via:
- Web site at Car-Net website
- Your VW mobile app
- Calling the Car-Net Response Center at 1-833-648-2735
For Model Year 2019 and older, you can unenroll by calling 1-877-820-2290
Once you have unenrolled the vehicles from Car-Net, please notify us via email at mcfna-deployment@michelin.com.
STEP 3
MERCEDES-BENZ OEM enablement Instructions
STEP 1 – PROVIDE THE VIN NUMBERS OF THE VEHICLES YOU WISH TO ACTIVATE
STEP 2 – NOTIFY US IF ANY LISTED VEHICLES ARE NOT DRIVEN ON A REGULAR BASIS
- Vehicles that are not driven regularly may go into a deep sleep state. In order to properly enroll your vehicles so they can transmit information to your MICHELIN MyConnectedFleet account, the listed vehicles should be driven within 3 days of activation.
- If all of your listed vehicles are driven regularly, skip to Step 3.
STEP 3